


Instructions Best Teacher Mug Rug
Instructions for Best Teacher Mug Rug
Design Specifications: 6.58 x 4.86
Stitch Count: 14499
NEVER COLOR SORT. GO BY MY COLOR CHARTS ONLY.
Supplies Needed:
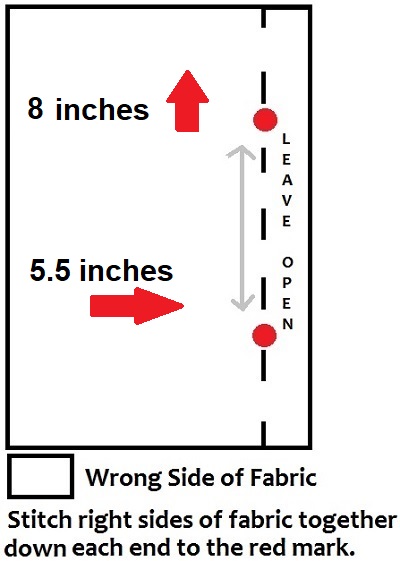
2 pieces of fabric cut 7 inches tall and 5.5 inches wide for the backing.
Medium Weight Stabilizer
Thin Batting
White/Light Print Fabric
Two Scraps colorful fabric
Thread
Spray Adhesive
Iron
Pressing Cloth
--------------------------------------
Instructions
1. Hoop Stablizer
2. Run Color #1 White Outline
3. Cut Batting and White Fabric to fully cover the outline stitch.
4. On Table Place batting and white fabric (right side up)
5. Spray adhesive between the white fabric and batting.
6. Smooth by hand. Make sure it is smooth.
7. Flip over.
8. Spray adhesive on the bottom of the batting layer.
DO NOT UNHOOP
9. Place over the outline stitch. Be sure to cover the outline stitch.
10. Gently press in place.
11. Run Color #2 Gray Tackdown Stitch
12. Run Color #3 Light Brown Outer Pencil
15. Run Color #4 Black Pencil Tip and Writing
13. Run Color #5 Light Yellow Outer Pencil
14. Run Color #6 Dark Yellow Outer Pencil
15. Run Color #7 Pink Eraser
16. Run Color #8 Gray Eraser Band
17. Run Color #9 Outline Placement Stitch for Both Appliques
18. Iron your two pieces of fabric. Spray wrong side with adhesive.
19. Place your scrap fabric sprayed side down and press down covering the outline placement areas.
20. Run Color #10 Gray Tackdown Stitch for the applique.
21. Run Color #11 Decorative Stitch over Fabric applique.
22. Run Color #12 Final Outline Satin Stich for applique.
23. Run Color #13 This is the placement stitch guide to place backing fabric.
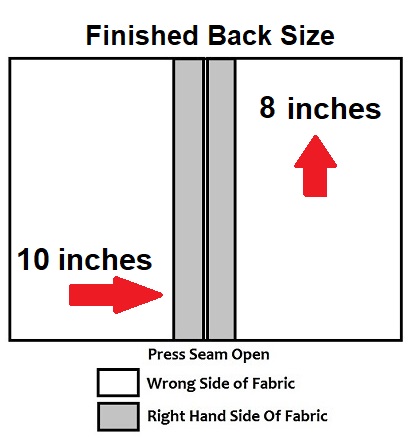
24. Now Prepare the Backing Fabric by stitching together the two pieces. Press seam open. (See photos).
25. Place Backing fabric right side down on top of the mug rug. Cover the mug rug completely. You may want to add a little spray adhesive or tape to hold the corners securely in place.
26. Run Color #14 This is the final stitch that will hold layers together.
27. Remove From Hoop
28. Trim seam allowance to 1/4 and turn. You may need a edge turner to make the corners nice.
29. Press Using a pressing cloth
30. Sew the back opening together with an invisible stitch by hand.
31. Repress with pressing cloth.
32. Show Off to all your friends or gift the rug..
NOTE: Digital Download Only
- You are purchasing machine embroidery designs. These are not hand embroidery or SVG.
- Once your order is complete you will return to a download page.
- You will also receive a backup email with download links. (Yahoo and Gmail will bounce my emails)
- Please check your email spam and trash folders.
- You must download the file to your computer, unzip the file and have a way to transfer the design/s to your embroidery machine.
- All design formats and sizes are included in a single zip file, PDF or image.
- Duplicated a design? This cart does not alert for duplicate orders or past purchases.
- However, a store credit, substitution or refund will be made at the sellers discretion within seven days of purchase.
- Bundle Offer duplicates are not eligible.
- Orders made BEFORE 10/20/2017 are unavailable due to a database crash. Please back up your orders.
- I cannot offer help regarding your embroidery machine, software, or computer related issues. Please direct those questions to the manufacturer.
- NO REFUNDS -- THESE ARE DIGITAL FILES -- IF YOU HAVE A PROBLEM PLEASE CONTACT SELLER FOR A RESOLUTION
All rights reserved Julia's Needle Designs.©

Follow Me Everywhere
![]()
![]()
![]()
![]()
![]()


